Creating Sub Tones On The Roland S-50 Sampler
I was unable to create a Sub Tone as shown in the Roland S‑50 Owner's Manual or the S‑50 Digital Sampler Basics Supplement so I have documented this alternate method. For the example shown below, I used the Roland v2.0 System/Utility Boot Disk - 08 JUN/87 to start‑up the sampler and then loaded the RSB_507‑08 Sound Disk titled SURF'S UP!. This Sound Disk is completely filled up with samples and there is no remaining time in any of the sample memory slots. This helps to demonstrate that creating a Sub Tone on the S‑50 will not use up any additional sample memory. A Sub Tone will only use Tone name characters and various parameter settings in 32 of the available sample memory slots (11‑18, 21‑28, 31‑38 or 41‑48). Compared to actual sample data used by original Tones, these characters and parameter settings use up only a fraction of sampler memory
The S‑50 (and also S‑550 / S‑330 / W‑30) allow you to borrow the wave data from an original Tone and create a different Tone (a Sub Tone) with different values of Tone parameters
✓ It's best to have a color monitor connected to the S‑50
≡ This is so you can see the menus shown in the examples below ≡
≡ This is so you can see the menus shown in the examples below ≡
Boot the sampler using the v2.0 System/Utility Start‑up Disk
Next, load the SURF'S UP! disk (Press DISK then P1 (LOAD ALL) then SHIFT then ENTER
After the SURF'S UP! disk has loaded
- Press the PLAY button
- Press the P1 button to choose the Patch called SURF GUITAR (shows up as P1 SURF GUITAR PATCH PLAY)
- Press the EDIT button
- Press the P3 button to show the TONE PRM page
- Note: You may need to press the PATCH button to toggle between the TONE PRM page and the COPY page
- Press the SHIFT button. Next, press the RIGHT ARROW button and a sub‑menu pops up on the right
- Press the LEFT ARROW button until some WHITE numbers highlighted in RED appear on the left side (Figure 1)
- Use the ALPHA DIAL to select sample Tone slot 48 (this must be an unused and empty slot!)
- This is the new Sub Tone slot we are going to create
- Press the RIGHT ARROW button until a new sub‑menu pops up on the right
- Use the ALPHA DIAL to select SOURCE 27
- SOURCE 27 should now be WHITE text highlighted with a RED background
- This is the original Tone we will use to create the new Sub Tone
- SOURCE 27 should now be WHITE text highlighted with a RED background
- Press the SHIFT button to make the pop up sub‑menu disappear
- Use the numeric keypad and press 2 then 7 then ENTER to select the sample Tone in slot 27
- Press the SHIFT button
- Press the RIGHT ARROW button until a new sub‑menu pops up on the right
- Press the DOWN ARROW button to highlight in RED, the line called COPY ALL
- The monitor shows Orig. Tone 27 and the text on the WHITE line shows 48 **27** COMMAND (Figure 2)
- Press the ENTER button
- Press the + PAGE button and use the ALPHA DIAL to name the new Sub Tone SandKik2
- Press the - PAGE button
- At this point, a new Sub Tone has been created in Tone slot 48 and is named SandKik2
- The monitor should show 48 SandKik2 ** 27 ** COMMAND
- To verify the new Sub Tone was actually created
- Press the P3 button
- Press the PATCH button
- A new Sub Tone called SandKik2 is highlighted with WHITE text on the Tone list in slot 48
- Circled in red - (Figure 3)
- All the other TONES highlighted with YELLOW text are samples which use up sample space memory
- This multiple color text highlighting is an easy way to differentiate between Tones and Sub Tones
- Another way to tell the difference between Tones and Sub Tones is by using this free utility
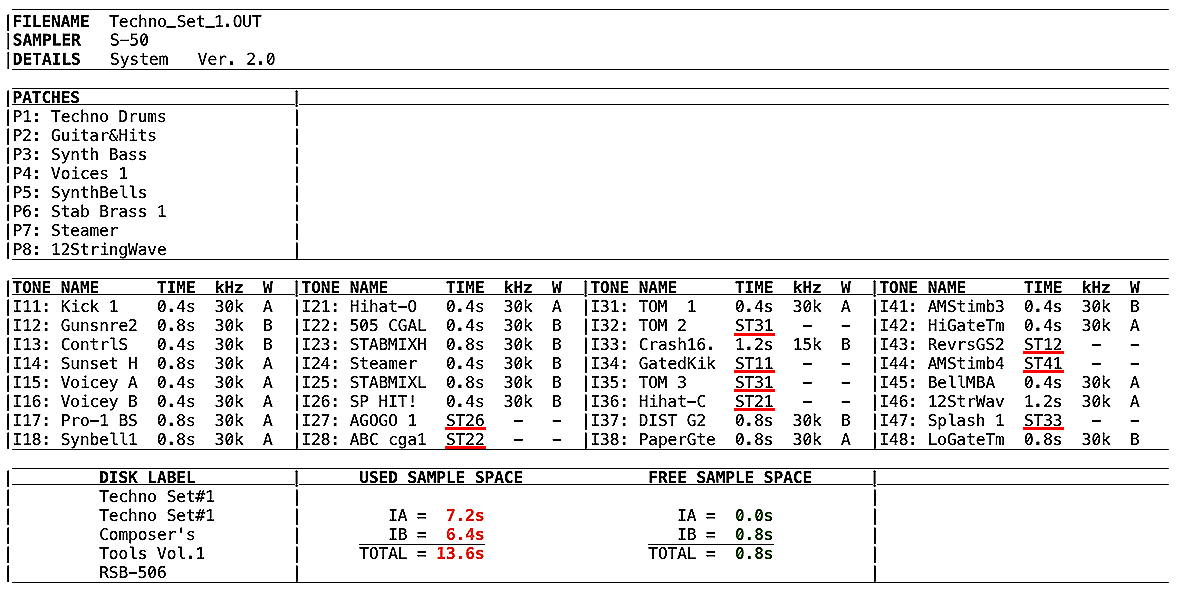
- Sub Tones will appear on the list in the TIME column as STnn where ST indicates it is a Sub Tone and nn= the Original Tone
- A new Sub Tone called SandKik2 is highlighted with WHITE text on the Tone list in slot 48
SURF'S UP!
If you need the RSB_507‑08 Sound Disk titled SURF'S UP! which is used in the above example, you can download it from here. It's an S‑50 Disk Image file called 068.IMG. This is a Converted S‑50 Disk from O/S Version 1.0 so there's no System on it. This means you will need to boot your S‑50 using a normal Start‑up disk first and then load 068.IMG as a Sound Disk (press DISK then P1 (LOAD ALL) then SHIFT then ENTER
So... What Exactly Is An S‑50 Sub Tone?
The S‑50 (and S‑550 / S‑330 / W‑30) allows you to borrow the wave data from an original Tone and make a separate Tone (a Sub Tone) with different values of Tone parameters. A Sub Tone does not sound unless wave data is borrowed from an original Tone. You can make a Sub Tone which is completely different from the original Tone which shares the same wave data. For instance, you can add vibrato or change the envelope to make a sound of a completely different nuance. Sub Tones are quite useful because they do not consume any extra sample memory space. They are a good way to maximize the number of sounds contained on a single floppy disk (or disk image file such as *.IMG and *.OUT)
A few of the disks in the S‑50 RSB library which really take advantage of extra sample space by using Sub Tones are
     RSB_506‑01 - Wild Kingdom
     RSB_506‑03 - MIDI Electric Piano & Bass
     RSB_506‑04 - Guitar & Stick
     RSB_506‑06 - Techno Set #1
The listing below for the Techno Set #1 disk shows the extra nine slots used to store Sub Tones for maximizing disk space (underlined in red)
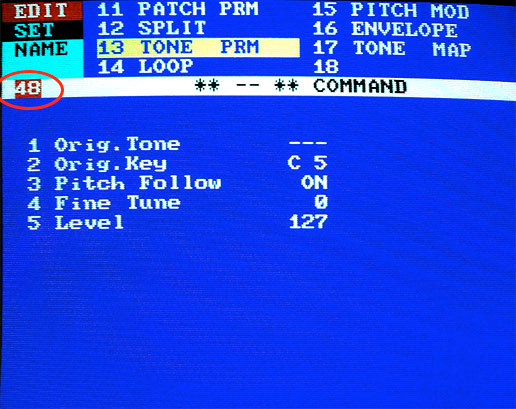 (Figure 1) |
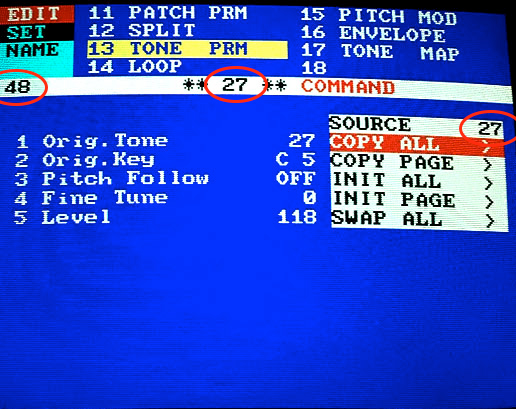 (Figure 2) |
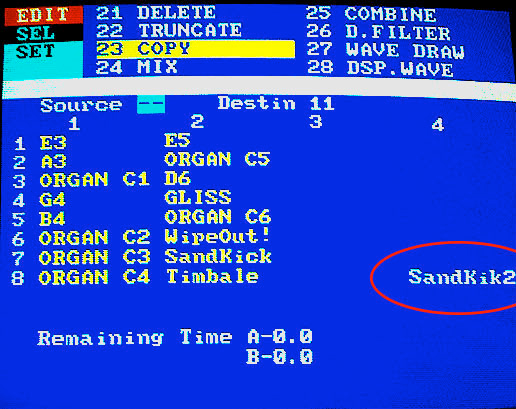 (Figure 3) |
| The soon‑to‑be Sub Tone (Slot 48) is highlighted by a red background |
Just prior to creating a new Sub Tone in Slot 48, The Source Tone (also the Original Tone) is in Slot 27
|
The newly created Sub Tone at Slot 48 is highlighted in WHITE text. The other Tones at 11 through 18 and 21 through 28 are Original Tones and are highlighted in YELLOW text. Note: The new Sub Tone name is SandKik2 |
|
|
||
|
All of the procedures described above will only work on the S‑50. If you want to create Sub Tones on the S‑330 or S‑550, refer to Page 3 of the Roland document titled, "S‑330/S‑550 Supplemental Notes v03‑98" When creating Sub Tones on the S‑330 or S‑550 it's important to note that in Step #7 of that document, when using the left/right mouse buttons, you need to hold the mouse button down a L_O_N_G_ time until you can find an original Tone slot. The fewer the original Tones on an S‑330 or S‑550 Sound Disk, the longer you will need to hold down the mouse button |
||
All images, text, JavaScript and HTML Code ©1995- by llamamusic.com
The Information On This Page Is Current As Of
The Information On This Page Is Current As Of
