ZIP-A-Dee-Doo-Dah!
ARCHIVING AND RESTORING S‑550 AND W‑30 ZIP DISKS, 80MB HARD DRIVES AND MicroSD CARDS
If you use a ZIP Drive, Hard Drive, or SCSI2SD device with your S‑550 or W‑30 sampler... read on! This info is for the "Super Geek" crowd and might not be useful for everyone. However, I wanted to document this since it's a powerful and inexpensive way to share ZIP Disks, Hard Drives and MicroSD cards by cloning 80MB image files of all 64 Areas of an S‑550 or W‑30
The examples used on this webpage make reference to "ZIP Disks" throughout. The Linux commands can be modified slightly to clone or restore 80MB Hard Drives and MicroSD cards as well. Depending on your system, it's usually as simple as choosing a different device. Likewise for Windows users. The HDD‑Raw‑Copy‑Tool utility uses identical commands for ZIP dives, Hard Drives and MicroSD cards. Substitute the correct Hard Drive device where needed
- SCSI2SD Users - A Special Note:
- You will need to use a 2GB or larger MicroSD card
- For most setups when using a SCSI2SD device, the MicroSD card is usually divided into four separate 80MB virtual hard drives. The HDD‑Raw‑Copy‑Tool utility will not list the SCSI ID#'s as 0, 1, 2, 3, etc... Instead, the MicroSD card is only recognized as one large disk device. It is possible to use the HDD‑Raw‑Copy‑Tool to archive and restore the entire MicroSD card and keep all four partitions intact. However, it is not possible to use this program to restore individual partitions one at a time. To restore individual partitions onto the MicroSD card one at a time, using the "dd" command line utility is the best method
- When archiving a MicroSD card using the HDD‑Raw‑Copy‑Tool or the "dd" command line utility, it is extremely important that you keep track of which disk device ID you are currently writing data to/from. Your computer's hard drive will be on the same list so don't mix them up!
OVERVIEW
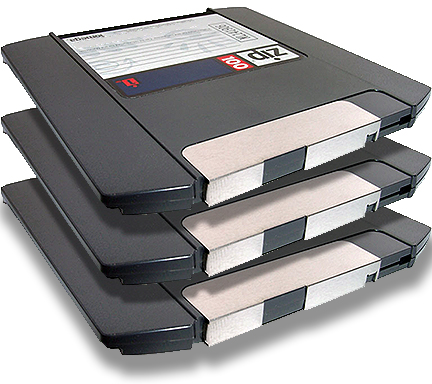
One of the problems with using ZIP disks is they are a Roland proprietary format. This means you can't put them in a Windows, Mac or Linux ZIP drive and back them up easily. This method is a great way to archive complete ZIP disks of your sampler library 64 Areas at a time. You can save the 80MB ZIP disk image file on a hard drive for safe keeping in the event one of your ZIP disks fails. It also enables S‑550 and W‑30 owners to effectively share 64 floppy disks at a time without the tedious process of loading 64 floppy disks individually. A freeware program called HDD‑Raw‑Copy‑Tool is used to accomplish this task for Windows 7 and Windows XP. For Linux and Mac, a utility command called "dd" is used
I have verified these methods will work with Windows 7, Windows XP and Linux with three types of ZIP drives... SCSI, Parallel and Internal*. Someday I'll verify this works with a USB ZIP drive but I don't own one. I'm unable to verify these methods will work on a Mac because I have no way of connecting a ZIP drive to my iMac. Apple keeps removing ports with every new model. Progress! Theoretically, if you have a SCSI, Parallel or Internal ZIP drive connected to a Mac, everything here should work
As usual, I'm a cheap bastard so no commercial software was used to get everything working. Ubuntu Linux is a free operating system and is very easy to install simply by downloading an *.iso file and burning it to a DVD. A freeware program for Windows 7 and Windows XP called HDD‑Raw‑Copy‑Tool is simple to use. The only real expense would be to add a PCI SCSI card to your PC. You can find these NOS cards on eBay for less than $10 (USD). The "dd" command is available by default on Mac OS X systems
Interestingly, I was able to clone an S‑550 and W‑30 ZIP disk using an old bare‑bones PC which did not even have a hard drive in it! I booted the PC using the Ubuntu DVD, loaded the kernel into memory, cloned the ZIP disk and saved the ZIP disk image file to a USB flash drive. Similarly, I installed Ubuntu onto a USB flash drive and was able to clone a ZIP disk using a second USB flash drive. I haven't documented those procedures yet but they do work. I was amazed.
* Unfortunately, Iomega dropped support for the Parallel ZIP drive with Windows 7 which means Parallel ZIP drives will not work with Windows 7. Luckily, the Iomega SCSI ZIP drive is treated as a block device and there are drivers for the Iomega Internal ZIP drive so these two have no compatibility issues with Windows 7
- REQUIREMENTS
- PC, Mac or Linux system with a SCSI, Parallel or Internal ZIP Drive (or hard drive) connected to it
- If your are using a SCSI2SD device, all you need is a MicroSD card reader
- Blank ZIP disk (or hard drive)
- (Optional) ZIP Disk #1, ZIP Disk #2, or ZIP Disk #3 - A series of 80MB cloned ZIP disk image files containing 64 sound disks each
|
SYSTEMS AND HARDWARE I USED FOR TESTING
|
Windows 7 Ultimate (32-Bit)
Roland S‑550 (HD5-IF SCSI)
Iomega SCSI ZIP Drive (Z100S2)
|
|
Windows XP (SP3)
Roland W‑30 (KW-30 SCSI IC)
Iomega Parallel ZIP Drive (Z100P2)
|
|
Linux - Ubuntu v16.04LTS (32-Bit)
Adaptec AVA-2902B PCI To SCSI Card
Iomega Internal ZIP Drive (Z250ATAPI)
|
NOTICE: Take extra care when executing these commands because if you get the devices mixed up, you can easily erase your entire sample disk and/or your computer's hard drive by accident. The 'dd' command and the HDD‑Raw‑Copy‑Tool (which is basically a GUI "dd" command) are VERY powerful. I recommended that you have all of your samples backed-up and also have a current backup of your computer hard drive. The best case scenario would be to install Linux, Windows or Mac OS X on a spare hard drive
and use it as a playground
WINDOWS 7 / WINDOWS XP
Note: Unfortunately, Iomega dropped the ball with their Parallel ZIP drive support for Windows 7 and they did not develop any drivers for it. The good news is that Windows 7 works just fine with a SCSI ZIP drive or an Internal ZIP drive. Windows XP has no issues at all and will work fine with a SCSI, Parallel or Internal ZIP drive
Attach an Iomega ZIP Drive to a PC running Windows 7 or Windows XP. It doesn't matter if it's a SCSI, Internal or Parallel ZIP drive (see Note: above re: Windows 7 and Parallel ZIP's). The most cost effective method, since you already own a SCSI ZIP drive, would be to purchase an Adaptec PCI SCSI card. You can find these on eBay for under $10 (USD) w/free shipping. The card I used was an Adaptec AVA‑2902B PCI to SCSI card. It has a female DB25 connector so you can use the same DB25M ◅‑‑‑▻ DB25M cable you are already using with your external SCSI ZIP drive for the S‑550 or W‑30. This card also has a 50-pin connector on the board just in case you might have an internal SCSI ZIP drive handy
- Download the freeware utility HDD‑Raw‑Copy‑Tool
- Open Windows Explorer and verify the ZIP drive has been recognized by Windows. In most cases, when you connect a ZIP drive to a Windows system and power on the PC, the ZIP drive is recognized automatically
|
ZIP DRIVE APPEARANCE ON MY DESKTOP USING WINDOWS EXPLORER |
| O/S |
Parallel |
SCSI |
Internal |
USB |
| Windows 7 |
Incompatible |
Removable Disk (D:) |
Removable Disk (D:) |
- Untested - |
| Windows XP |
Iomega Zip 100 ‑or‑ 250 (D:) |
Removable Disk (D:) |
Removable Disk (D:) |
- Untested - |
If the ZIP dive has not been recognized by Windows, you will need to run the Disk Management Admin Tool, locate the ZIP drive (displayed as Removable Media) and choose "Change Drive Letter And Path"
Windows XP: Click on Start and then Run. In the command text box type diskmgmt.msc followed by the Enter key
Windows 7: Click on Start and type diskmgmt.msc in the command text box followed by the Enter key
The ZIP drive letter D: used in the examples below indicate the drive letter the ZIP drive is assigned to. This may differ on your system. If it is different, make note of it and substitute it where needed in the commands below. It could be F: E: G: Z: or something completely different depending how many SCSI or IDE devices are installed on your system. Make sure you choose the correct ZIP drive letter because it could mean the difference between a successful copy or wiping out your entire ZIP sample disk or even your hard drive! I'm speaking from experience. The bad kind. The HDD‑Raw‑Copy‑Tool is very powerful. "Do not arouse the wrath of the great and powerful Oz!"
TO CREATE A NEW ZIP DISK FROM AN 80MB ZIP DISK IMAGE FILE DOWNLOADED FROM THE INTERNET or
TO RESTORE AN ARCHIVED ZIP DISK YOU MADE PREVIOUSLY
- Place a blank ZIP disk you want to overwrite into the ZIP drive on the PC
*** VERY IMPORTANT *** If a window pops up and says Format, DO NOT format it! Cancel!
- Run the HDD‑Raw‑Copy‑Tool utility
- Select a SOURCE file. This will be a ZIP Disk image file you downloaded from the Internet (or a ZIP Disk archive file)
Double-click on the FILE section to select a file (In this example, the filename used is zipdisk1.img)

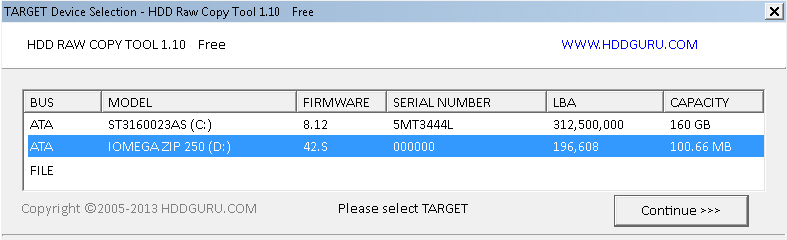
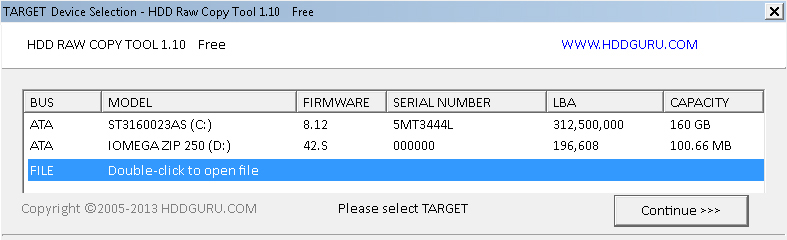
- Select the TARGET ZIP Disk drive and click on the Continue button
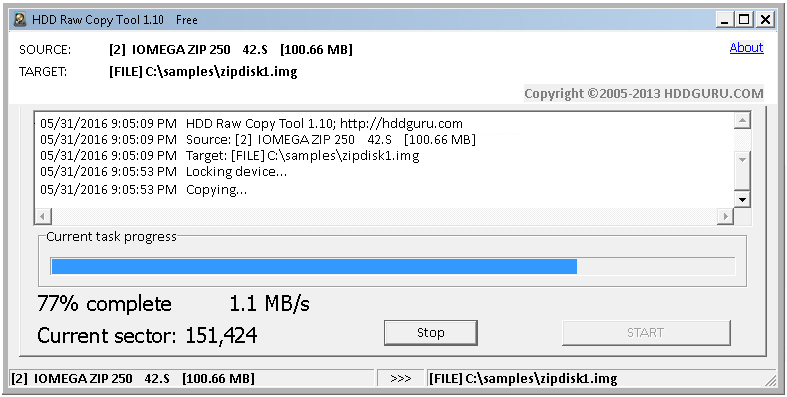
- After verifying the SOURCE and TARGET are correct, click the START button to begin the sector-by-sector copy
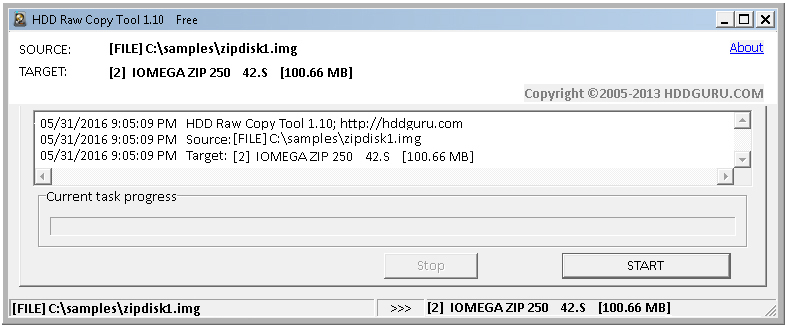
- The "File to ZIP Disk" copy process will start and show a progress screen
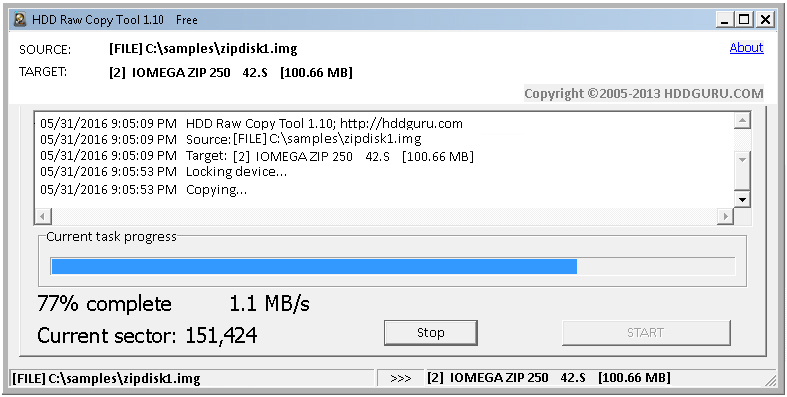
- When finished, remove the ZIP disk and pop it into the ZIP drive on the S‑550 or W‑30 and see if you can load samples to verify it works
TO ARCHIVE AN 80MB ZIP DISK (This is just reversing the same process shown above)
- Place your ZIP disk filled up with samples into the ZIP drive on the Windows PC
*** VERY IMPORTANT *** If a window pops up and says Format, DO NOT format it! Cancel!
- Run the HDD‑Raw‑Copy‑Tool utility
- Select the SOURCE disk drive. This will be your ZIP Disk filled up with samples which you just put into the ZIP drive
In this example it is shown as drive D:

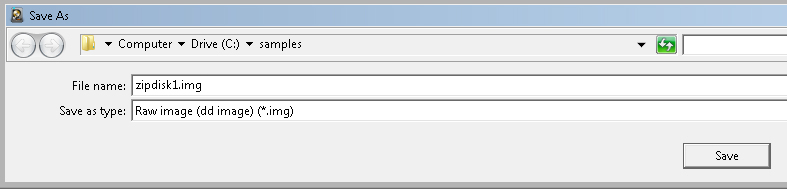
- Select a TARGET file. This will be the ZIP Disk image file you are creating
Double-click on the FILE section to create a new file (In this example, the filename used is zipdisk1.img)
- Type a new filename into the text box and Save as type: Raw image (dd image) (*.img)
- After verifying the SOURCE and TARGET are correct, click the START button to begin the sector-by-sector copy
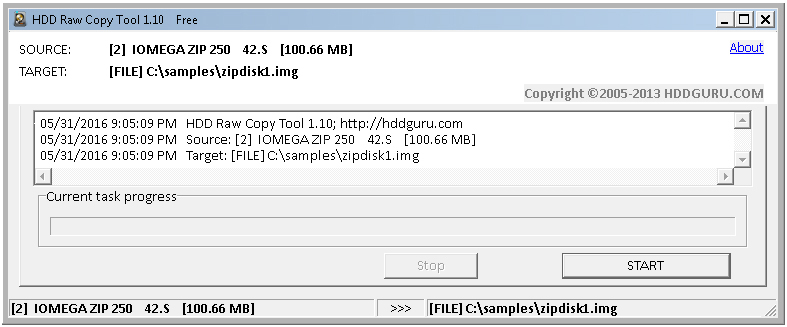
- The "Disk to File" copy process will start and display a progress screen
- When completed, you will have a clone of your original ZIP disk called zipdisk1.img (or whatever you decided to name it). The file is a large 100MB disk image.
So now what can you do with this ZIP disk image file?
Some options would be
- Keep it on a hard drive somewhere as an archive file so you always have a backup of the ZIP disk
- Share it. Place it on a server somewhere so other S‑550 and W‑30 owners can download it (Hint, Hint)
- Pop it onto a USB stick. Share it with an S‑550 or W‑30 owner via snail mail (safer than sending a ZIP disk in the mail)

Attach an Iomega ZIP Drive to a PC running Ubuntu Linux v16.04LTS. It doesn't matter if it's a SCSI, Parallel or Internal ZIP drive. The most cost effective method, since you already own a SCSI ZIP drive, would be to purchase an Adaptec PCI SCSI card. You can find these on eBay for under $10 (USD) w/free shipping. The card I used was an Adaptec AVA‑2902B PCI to SCSI card. It has a female DB25 connector so you can use the same DB25/‑‑/Centronics50 cable you are already using with your external SCSI ZIP drive for the S‑550 or W‑30. This card also has a 50-pin connector on the board just in case you might have an internal ZIP drive handy. Although these commands are for Ubuntu Linux, similar commands will probably work depending on different flavors of Linux
- If you are using a Parallel ZIP drive, you will need to enable the Linux system to recognize it. Load the Linux kernel module for the Parallel ZIP drive by opening a Terminal window and type
Depending on the type of ZIP drive you are using, you may need to use different modprobe commands such as
- sudo modprobe paraport
- sudo modprobe paraport_pc
- sudo modprobe ppdev
- sudo modprobe ppa
- sudo modprobe sdb
- If you are using a SCSI ZIP drive, in most cases it will be detected automatically by the Linux system. It most often appears as one device below the last hard drive in the SCSI chain since most external Iomega SCSI ZIP drives can only set to SCSI ID#5 or ID#6. If you have one hard drive on the system and one SCSI ZIP drive, the hard drive will normally be shown as device /dev/sda and the SCSI ZIP drive will be shown as device /dev/sdb
- If you are using an Internal IDE ZIP drive, in most cases it will be detected automatically by the Linux system. It most often appears as one device above the hard drive device chain. If you have one hard drive on the system and one Internal IDE ZIP drive, the hard drive will normally be shown as device /dev/sdb and the Internal ZIP drive will be shown as device /dev/sda
- To verify if the Parallel ZIP drive, SCSI ZIP drive or Internal ZIP drive is recognized by the Linux kernel, type
- sudo lshw -short -class disk
If the ZIP drive is recognized by the Linux kernel, the output will look something similar to this
- /dev/sdb disk ZIP 100 or /dev/sdb disk ZIP 250
The /dev/sdb indicates the device the ZIP drive is assigned to. This may differ on your system. If it is different, make note of it and substitute it where needed in the commands below. It could be /dev/sda, /dev/sdc, /dev/sdd, or something completely different depending how many SCSI devices or IDE devices are installed on your system. Make sure you choose the correct ZIP device assignment because it could mean the difference between a successful copy or wiping out your entire ZIP sample disk or even your hard drive! I'm speaking from experience. The bad kind. The "dd" command is very powerful. "Do not arouse the wrath of the great and powerful Oz!"
TO CREATE A ZIP DISK FROM AN 80MB ZIP DISK IMAGE FILE DOWNLOADED FROM THE INTERNET
- Format a blank ZIP disk on the S‑550 or W‑30
- Take the ZIP disk you just formatted on the S‑550 or W‑30 and place it in the ZIP drive connected to the Linux computer. Open a Terminal window and type
- sudo dd if=/home/twilightzone/zipdisk1.img of=/dev/sdb bs=1M
where;
/home/twilightzone/ is the home directory containing the zipdisk1.img file you downloaded from the Internet
/dev/sdb is the Linux device being used for the ZIP drive
After a few minutes, a new ZIP disk is created.
If successful, the Terminal window will display something similar to this;
196608+0 records in
196608+0 records out
10066296 bytes (100 MB) copied, 106.023 s, 943 kB/s
- Eject the ZIP disk and load it into a ZIP drive connected to the S‑550 or W‑30. If successful, you should be able to access all 64 Areas contained on this new ZIP disk
I'll be placing some ZIP disk image files with complete libraries for downloading at the SAMPLES Page soon and plan to add some more later on. As you know... it takes a while to add and save 64 Areas!
TO CREATE AN 80MB ZIP DISK IMAGE FILE TO ARCHIVE OR TO UPLOAD TO THE INTERNET
- Place your S‑550 or W‑30 ZIP disk with all the samples on it into the ZIP drive. Open a Terminal window and type
- sudo dd if=/dev/sdb of=/home/twilight/myzipdisk.img bs=1M
where;
/dev/sdb is the Linux device being used for the ZIP drive
/home/twilightzone/ is the directory where you want to create the myzipdisk.img file
After a few minutes, a new ZIP disk image file is created called myzipdisk.img.
If successful, the terminal window will show something similar to this;
196608+0 records in
196608+0 records out
10066296 bytes (100 MB) copied, 106.023 s, 943 kB/s
- Pop it into the ZIP drive on the S‑550 or W‑30 and see if you can load samples and verify it works
- You now have a clone of your original ZIP disk called myzipdisk.img which is a large 100MB disk image file.
So now what can you do with this ZIP disk image file?
Some options would be
- Keep it on a hard drive somewhere as an archive file so you always have a backup of the ZIP disk
- Share it. Place it on a server somewhere so S‑550 and W‑30 owners can download it (Hint, Hint)
- Pop it onto a USB stick. Share it with an S‑550 or W‑30 owner via snail mail (safer than sending a ZIP disk in the mail)
MISCELLANEOUS LINUX ITEMS
When using the command line with Ubuntu Linux, the bs=1M switch tells the "dd" command to read or write 1MB block sizes. This greatly speeds up the I/O process. When I used the "dd" command without this switch to write a file, it took 19 minutes to complete. After adding the bs=1M switch, writing a file only took 8 minutes. You can experiment with using larger blocks of 2M, 4M, 8M, etc... I used 1M in these examples to be safe because some PC's have a limited buffer area. If the block size is too large, the I/O process will fail. Another useful switch is status=progress. You can add this switch to see a visual process indicator. As an example, when issuing this command
sudo dd status=progress if=/dev/sdb of=/home/twilight/myzipdisk.img bs=1M
the following example output will update periodically to show you that something is happening... which is more satisfying than staring at a blank prompt
61432564 bytes (61 MB) copied, 52.024 s, 1.18 MB/s
The
sudo command used at the front of every line entry tells the Linux kernel to issue the command as the "root" user. Using
the
sudo command will usually prompt you for the system password which is normal
MAC OS X
Roger Moes has put together an excellent step‑by‑step guide here for using ZIP drives with Mac and a W‑30. Thanks Roger!!! This process can also be applied to the S‑550 as well
The Information On This Page Is Current As Of
|