Join the "Roland Alpha Juno" group on Facebook


If you find some of this DIY info useful, please consider donating a small amount. All donations are used for future DIY sampler development and free info. Thanks!

|

|

This Page Contains MKS‑50, Alpha Juno‑1, Alpha Juno‑2, HS‑10 And HS‑0 Information about;
 FAQ - Manuals, Service, Troubleshooting, And Factory Presets
SPECS - Dimensions, Power, Audio Output, ROM And RAM
AFTERTOUCH - Suggestions For Fixing This Common Problem
ACCESSORIES - PG‑300, BCR2000, KIWI‑PE, M‑64C, EV‑5, DP‑2 And FS‑1
POWER SWITCH - High Quality Power Switch Replacements
FACTORY RESET - Procedures To Restore Your Synth To A "Factory Fresh" State
CHORD MEMORY - Creating, Saving And Playing New Chords
ROM IC VERSIONS - Revisions And Bug Fixes
SYSEX ELEMENTS - Commands Specific To The MKS-50 and Alpha Juno & HS Synths
ERROR MESSAGES - Common Error Messages And Troubleshooting
SYNTH COMPARISONS - Differences Between The Five Synths
FUSE REPLACEMENTS - AC Power Fuse Replacement Info
ODDBALL POWER CORD - Get Rid Of That Boondoggle!
BATTERY REPLACEMENT - Internal Battery Replacement Guide
ENCODER REPLACEMENT - A Low Cost Encoder DIY And Super Easy!
MKS-50 LCD CONTRAST MOD - An Easy Modification To Change The Viewing Angle
LOADING & SAVING TONE BANKS - Methods, Troubleshooting Tips
& "How-To's"
BENDER BAR/MODULATION ISSUES - Troubleshooting Tips
MKS-50 TACT SWITCH REPLACEMENT - Make Your Synth Responsive Again
LOADING & SAVING INDIVIDUAL TONES - The Roland APR Programming Kludge
HARDWARE PROGRAMMERS & EDITORS - A Brief Overview Of What's Out There
FAVORITE DIY TOOLS AND DIY VENDORS ‑ Tips For DIY Freaks Who Like To Save $$$
ALPHA JUNO & HS-10 LCD REPLACEMENT - STOP That Horrible Shrill!
ALPHA JUNO TACT SWITCH REPLACEMENT - Make Your Synth Responsive Again FAQ - Manuals, Service, Troubleshooting, And Factory Presets
SPECS - Dimensions, Power, Audio Output, ROM And RAM
AFTERTOUCH - Suggestions For Fixing This Common Problem
ACCESSORIES - PG‑300, BCR2000, KIWI‑PE, M‑64C, EV‑5, DP‑2 And FS‑1
POWER SWITCH - High Quality Power Switch Replacements
FACTORY RESET - Procedures To Restore Your Synth To A "Factory Fresh" State
CHORD MEMORY - Creating, Saving And Playing New Chords
ROM IC VERSIONS - Revisions And Bug Fixes
SYSEX ELEMENTS - Commands Specific To The MKS-50 and Alpha Juno & HS Synths
ERROR MESSAGES - Common Error Messages And Troubleshooting
SYNTH COMPARISONS - Differences Between The Five Synths
FUSE REPLACEMENTS - AC Power Fuse Replacement Info
ODDBALL POWER CORD - Get Rid Of That Boondoggle!
BATTERY REPLACEMENT - Internal Battery Replacement Guide
ENCODER REPLACEMENT - A Low Cost Encoder DIY And Super Easy!
MKS-50 LCD CONTRAST MOD - An Easy Modification To Change The Viewing Angle
LOADING & SAVING TONE BANKS - Methods, Troubleshooting Tips
& "How-To's"
BENDER BAR/MODULATION ISSUES - Troubleshooting Tips
MKS-50 TACT SWITCH REPLACEMENT - Make Your Synth Responsive Again
LOADING & SAVING INDIVIDUAL TONES - The Roland APR Programming Kludge
HARDWARE PROGRAMMERS & EDITORS - A Brief Overview Of What's Out There
FAVORITE DIY TOOLS AND DIY VENDORS ‑ Tips For DIY Freaks Who Like To Save $$$
ALPHA JUNO & HS-10 LCD REPLACEMENT - STOP That Horrible Shrill!
ALPHA JUNO TACT SWITCH REPLACEMENT - Make Your Synth Responsive Again
|
 I think these two topics are important enough to place at the top of all my synth INFO webpages
1) I buy a lot of broken synths on eBay and I'm able to fix about 90% of everything I find. It's usually a simple fix. If you have a synth with no power or intermittent problems after it warms up, it's probably due to the fact that back in the 1980's Roland and other synth makers used sub‑par solder and/or not enough solder to hold components in place. After 30+ years, the solder begins to break down and hairline fractures appear. This occurs at a higher rate for components which generate a lot of heat like Bridge Rectifiers, Power Transistors, large Electrolytic Capacitors, power input jacks and audio jacks which get a lot of use. The best approach is to use a magnifying glass and carefully inspect the backside of the circuit board. If you spot any suspect areas, re‑flow a hefty amount of NEW solder
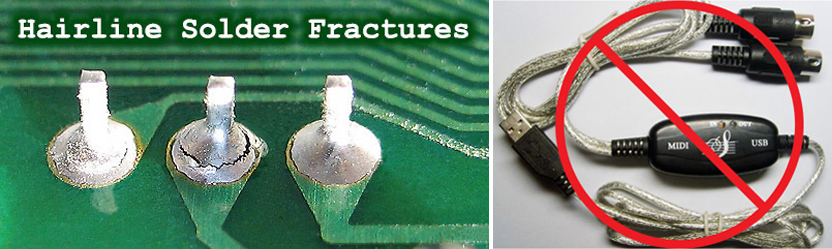
2) I receive a lot of eMails and field many questions at synth related forums and also on Facebook. The most common question I get about problems with a synth has to do with errors when trying to load Patches and Tones. About 99.9% of the time, the problem always turns out to be a crappy MIDI interface. If you have a cheapo MIDI interface which looks similar to the one shown on the right... throw this piece of shit in the trash! Do It Now. Seriously! This thing is total junk and you get what you pay for. Inexpensive MIDI interfaces like this are unable to properly regulate the buffering of MIDI data. They will work fine with simple messages such as CC, Note On, Note Off, etc... however, when you try to send SysEx messages which are much longer, the SysEx data cuts off after only sending a few bytes. Investing in a higher quality MIDI interface will solve Load/Save errors and other communication problems. Also, if you experience errors when transferring Patch and Tone data from a computer to a synthesizer, DON'T use a USB hub. Plug your MIDI interface directly from the computer to the synthesizer. Why? Some external USB hubs fail when multiple USB devices are attached because there is not enough power to share. Small power sags will suddenly cause one or ALL of the attached USB devices connected to the hub to fail, often accompanied with a "disconnect" signal
These MIDI interfaces have been tested and will work with large SysEx Dumps:
       ✓ Focusrite Scarlett 2i4 2nd Gen   ✓ M-Audio Profire 2626        ✓ ESI Midimate eX         ✓ ESI Midimate II
       ✓ Focusrite Scarlett 4i4 2nd Gen   ✓ Miditech MIDIface II Thru   ✓ Yamaha UX 16 USB/MIDI   ✓ MOTU 823 mk3
       ✓ Focusrite Scarlett 6i6 3rd Gen   ✓ Tie Studio MIDI 1i1o        ✓ Miditech MIDIface 4x4   ✓ RME FireFace UC 2X2
       ✓ iConnectivity mio 1x1            ✓ iConnectivity mioXC 1x1
These MIDI interfaces are shit and do not work with large SysEx Dumps (some might w/special driver):
      ✗ AVID/M-Audio Fast Track Pro      ✗ M-Audio MIDISport UNO        ✗ M-Audio MIDISport 1x1  ✗ M-Audio Uno
      ✗ M-Audio MIDISport 2X2            ✗ Lekato MIDI USB              ✗ Hosa USM-422 MIDI      ✗ Fore MIDI Interface
      ✗ DigitalLife MIDI-C01             ✗ Hosongnic, HiFangeow, etc...
 MKS-50 Owner's Manual (v.86-11)
Alpha Juno-1 Owner's Manual (v.85-12)
Alpha Juno-2 Owner's Manual (v.88-2)
Deutsche Bedienungsanleitungen für Alpha Juno-1 und Alpha Juno-2
SynthPlus 10 [HS-10] Owner's Manual (v.86-2)
SynthPlus 80 [HS-80] Owner's Manual (v.86-4)
MKS-50 Owner's Manual (v.86-11)
Alpha Juno-1 Owner's Manual (v.85-12)
Alpha Juno-2 Owner's Manual (v.88-2)
Deutsche Bedienungsanleitungen für Alpha Juno-1 und Alpha Juno-2
SynthPlus 10 [HS-10] Owner's Manual (v.86-2)
SynthPlus 80 [HS-80] Owner's Manual (v.86-4)
FREE Owner's Manuals for almost every synthesizer and effects device can be found at MidiManuals.com:
midimanuals.com
MKS-50 Service Notes (v.87-1)
Alpha Juno-1 / SynthPlus 10 Service Notes (v.85-12)
Alpha Juno-2 Service Notes (v.86-1)
Gigantic collection of Service Manuals w/schematics may be downloaded FREE at this link.
These are the highest quality PDF's on the Internet
https://web.archive.org/web/20251122182703/https://www.synfo.nl/pages/servicemanuals.html
http://youtu.be/TKpC13qdnbQ


For MKS‑50: Bulk*Load (Notice the *Asterisk* !!!)
For Alpha Juno, SynthPlus 10 & SynthPlus 80: Bulk Load MIDI.o (Notice the lowercase 'o' !!!)
* Note: If your synth locks up at the Bulk Load MIDI.o message, try adjusting the transmit settings of your SysEx program to a slower speed
MKS-50
[ WARNING!!! Everything in the internal memory will be erased! ]
1) Connect MIDI Out and MIDI In cables between the MKS-50 and the computer
2) Press [ TUNE/MIDI ] and the display will read TUNE > 442 <
3) Press [ PARAM ∇ ] and then press [ VALUE ∇ ] until all of the settings look like this;
       MIDI CHANNEL=  1
       MIDI OMNI   = OFF
       MIDI PROG.CG= ON
       PCH ASG MODE= ON
       TX C.M. APR = ON
       TX PATCH APR= ON
       TX TONE APR = ON
       MEM. PROTECT= OFF
4) Press [ DATA TRANSFER ] then press [ PARAM ∇ ] until the Display reads Bulk*Load (Notice the *Asterisk* !!!)
5) Press [ VALUE ∇ ] until the Display reads Bulk*Load [T-a] (Notice the *Asterisk* !!!)
6) Press [ WRITE ] and the display will read Bulk*Load -Run-
7) Use a SysEx loader program on your computer to send the SysEx file to the MKS-50 (See the TONES page for Factory Preset *.SYX Files)
8) The MIDI MESSAGE LED on the MKS-50 front panel should now be flashing while the data is being sent
Successful Transmission? The display reads Bulk*Load ..END.
Failed Transmission? The display reads Bulk DT-MISMATCH
This indicates the wrong transfer mode was selected or the *.SYX file is not valid.
Try it again using Bulk*Load [T-a] not Bulk*Load [P-A]. Re-check your settings and/or the *.SYX file.
Optional
To Load Patch Parameter Files and Chord Memory files, use the same procedures as shown above for loading Tones but instead use;
Bulk*Load [P-A] for Patch Parameter Files or Bulk*Load [CM ] for Chord Memory Files
Select an appropriate companion file to match your Tone file names
These factory Patch Parameter files and Chord Memory files are included in the MKS50_Alpha_Juno_Collection-A.zip file
available for downloading at the TONES page;
x-PatchParameters-MKS50-FACTORYA.SYX
x-PatchParameters-MKS50-FACTORYB.SYX
x-ChordMemory-MKS50.SYX
There is also an undocumented shortcut to quickly transfer all of the Tone names in Tone Group 'b' to Patch Group 'B' however, it will erase all of the Tones in Tone Group 'a' and restore them to the factory defaults
1) Load a bank of Tones into Tone Group 'b' then hold the [4] + [8] buttons during the next power-up
2) All Group 'b' Tone names will overwrite all Group 'B' Patch names leaving all the Tone Group 'b' data intact
Alpha Juno-1 / Alpha Juno-2 / SynthPlus 10 / SynthPlus 80
[ WARNING!!! Everything in the internal memory will be erased! ]
1) Connect MIDI OUT and MIDI IN cables between the Alpha Juno (or SynthPlus) and the computer
2) Set the MEMORY PROTECT SWITCH on the back of the keyboard to the OFF position
3) Press [ MIDI ] and the display will read MIDI CH = #
4) Turn the α-Dial until all of the settings look like this;

MIDI CHANNEL= 1
MIDI OMNI = OFF
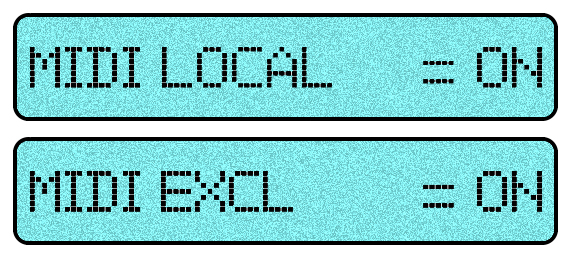
MIDI LOCAL = ON
MIDI AFTER = ON
MIDI BENDER = ON
MIDI EXCL = ON
MIDI HOLD = ON
MIDI PROG C = ON
MIDI VOLUME = ON
MIDI PORTA = ON
5) Press and hold in order [ DATA TRANSFER ] - [ WRITE ] - [ BULK LOAD ] until the display reads Bulk Load MIDI.o (Notice the lowercase 'o' !!!)
6) Use SysEx loader program on computer to send the SysEx file to the Alpha Juno or SynthPlus (See the TONES page for Factory Preset *.SYX Files)
Troubleshooting BULK LOAD (Alpha Juno-1 / Alpha Juno-1 / SynthPlus 10 / SynthPlus 80 Only)
If you press and hold in order [ DATA TRANSFER ] - [ WRITE ] - [ BULK LOAD ] and the display shows "Bulk Load Cancel" try this sequence:
1) Set MEMORY PROTECT switch ON
2) Power OFF the Alpha Juno-1
3) Power ON the Alpha Juno-1
4) Set MEMORY PROTECT switch OFF
5) Press and hold in order [ DATA TRANSFER ] - [ WRITE ] - [ BULK LOAD ]
If that doesn't work, with the power ON, set MEMORY PROTECT switch ON then set to OFF then try Step #5 until the display reads
Bulk Load MIDI.o
For MKS‑50: Bulk*Dump (Notice the *Asterisk* !!!)
For Alpha Juno, SynthPlus 10 & SynthPlus 80: Bulk Dump MIDI.o (Notice the lowercase 'o' !!!)
1) Set the MKS-50 as shown above for the procedure "Restore The Factory Preset Tones"
2) Run any generic SysEx capture program on your computer and set it to record SysEx data
3) Press [ DATA TRANSFER ] then press [ PARAM ∇ ] until the Display reads Bulk*Dump (Notice the *Asterisk* !!!)
4) Press [ VALUE ∇ ] until the LCD Display reads Bulk*Dump [T-a] (Notice the *Asterisk* !!!)
5) Press [ WRITE ] and the display will read Bulk*Dump -Run-
6) Your generic SysEx program should now be capturing SysEx data from the synthesizer
7) When the LCD Display Window displays Bulk*Dump -End-, save the data as a SysEx file
Alternatively, you can also;
• Save 'Tone Bank b' by setting the LCD Display to read Bulk*Dump [T-b]
• Save Patch Parameters using Bulk*Dump [P-A] or Bulk*Dump [P-B]
• Save Chord Memory using Bulk*Dump [CM ]
Alpha Juno-1 / Alpha Juno-2 / SynthPlus 10 / SynthPlus 80
1) Connect MIDI OUT and MIDI IN cables between the Alpha Juno (or SynthPlus) and the computer
2) Set the MEMORY PROTECT SWITCH on the back of the keyboard to the ON position
3) Press [ MIDI ] and the display will read MIDI CH = #
4) Turn the α-Dial until all of the settings look like this;

       MIDI CHANNEL= 1
       MIDI OMNI   = OFF
       MIDI LOCAL  = ON
       MIDI AFTER  = ON
       MIDI BENDER = ON
       MIDI EXCL   = ON
       MIDI HOLD   = ON
       MIDI PROG C = ON
       MIDI VOLUME = ON
       MIDI PORTA  = ON
4) Run any generic SysEx capture program on your computer and set it to record SysEx data
5) Press and hold in order [ DATA TRANSFER ] - [ WRITE ] - [ BULK DUMP ]
The following will appear in the LCD Display Window:
Bulk Dump MIDI.o (Notice the lowercase 'o' !!!)
6) Your generic SysEx program should now be capturing SysEx data from the synthesizer
7) When the LCD Display Window displays Bulk Dump MIDI.End, save the captured data as a SysEx file
Troubleshooting BULK DUMP (Alpha Juno-1 / Alpha Juno-1 / SynthPlus 10 / SynthPlus 80 Only)
If you press and hold in order [ DATA TRANSFER ] - [ WRITE ] - [ BULK DUMP ] and the display shows "Bulk Dump Cancel" try this sequence:
1) Set MEMORY PROTECT switch ON
2) Power OFF the Alpha Juno-1
3) Power ON the Alpha Juno-1
4) Set MEMORY PROTECT switch OFF
5) Press and hold in order [ DATA TRANSFER ] - [ WRITE ] - [ BULK DUMP ]
If that doesn't work, with the power ON, set MEMORY PROTECT switch ON then set to OFF and try Step #5 until the display reads Bulk Dump MIDI.o
MKS-50
1) Is the MIDI Channel set to 1?
Press [ TUNE/MIDI ] and the display will read TUNE > 442 <
Press [ PARAM ∇ ] and use [ VALUE ∇ ] until the display reads MIDI CHANNEL= 1
2) Is the computer Sound Card, MIDI Controller, SysEx Librarian, etc... set to MIDI Channel 1?
3) Is the computer Sound Card, MIDI Controller, SysEx Librarian, sending MIDI data to the MKS-50?
4) Make sure the patch librarian or SysEx program can send and receive SysEx data to and from the MKS-50
5) Do you have two MIDI cables connected? Two are required because SysEx uses both MIDI IN and MIDI OUT
Alpha Juno-1 / Alpha Juno-2 / SynthPlus 10 / SynthPlus 80
The most common communication errors are with System Exclusive so start with that one;
1) Is System Exclusive turned ON? Press [ MIDI ] until MIDI EXCL appears. Turn the α-Dial until until the display reads MIDI EXCL = ON
2) Is the MIDI Channel set to 1? Use the same procedure as above until the display reads MIDI CHANNEL= 1
3) Is the computer Sound Card, MIDI Controller, SysEx Librarian, etc... set to MIDI Channel 1?
4) Is the computer Sound Card, MIDI Controller, SysEx Librarian, sending MIDI data to the Alpha Juno?
5) Make sure the patch librarian or SysEx program can send and receive SysEx data to and from the Alpha Juno
6) Do you have two MIDI cables connected? Two are required because SysEx uses both MIDI IN and MIDI OUT
7) Is the MIDI interface connected to a USB hub? USB hubs are notorious for transfer glitches. Plug straight into the computer
* Note: If your synth locks up at the Bulk Load MIDI.o message, try adjusting the transmit settings of your SysEx program to a slower speed
And... ... ...
Another thing to check is the MIDI INTERFACE connected to your computer. Some inexpensive MIDI interfaces which look similar to this piece of shit are unable to properly regulate the buffering of MIDI data. Some of these inexpensive MIDI interfaces will work fine with simple messages such as CC, Note On, Note Off, etc... However, when you try to send SysEx messages which are much longer, the SysEx data cuts off after only sending a few bytes. Investing in a higher quality MIDI interface may solve Load/Save errors and other communication problems. If you have a cheapo MIDI interface which looks that one... throw this piece of shit in the trash! Do It Now. Seriously! This thing is total junk and you get what you pay for
With the power OFF, press and hold the [ PATCH A↔B ] and [ DATA TRANSFER ] buttons and then power ON the synthesizer
The LCD shows RAM check OK !!
This clears the old CHECK BATTERY!!! message and tests the RAM. Any errors will display RAM wr/rd ERR !!
Alpha Juno-1 / Alpha Juno-2
Power ON the synthesizer
Set the MEMORY PROTECT SWITCH on the back of the keyboard to the OFF position
Power OFF the synthesizer and wait 30 seconds
Press and hold the [ PORTAMENTO ] and [ DATA TRANSFER ] buttons and then power ON the synthesizer
The LCD will briefly display "Initlz Funct ram"
This next step will overwrite all Tones in user memory
Turn the Alpha Juno OFF and wait 30 seconds
Press and hold down the [ KEY TRANSPOSE ] and [ PORTAMENTO ] buttons while turning the POWER button ON
The display will briefly show [ Copy Prest → Memry ]
SynthPlus 10 / SynthPlus 80
Power ON the synthesizer
Set the MEMORY PROTECT SWITCH on the back of the keyboard to the OFF position
Power OFF the synthesizer
Press and hold the [ BRILLIANCE ] and [ DATA TRANSFER ] buttons and then switch the power on
To resume normal operation, cycle the power and verify the "Check Battery!!" error message no longer appears
Note: If you continue to see the "Check Battery!!" error message after following all the steps shown above, double check these items:
- Did you press the the buttons down hard enough? Over time, the tact switches are less responsive and need to be pressed down firmly
- Before starting any reset procedures, did you set the MEMORY PROTECT SWITCH to the OFF position and then turn the power OFF?
- Verify the new battery is actually a new one, not defective and measures near 3.0V on a Voltmeter

Alpha Juno‑1 With a $4 buydisplay.com BLACK/WHITE LCD Installed
Alpha Juno & HS-10 LCD DIY (PDF)
Update May 2025:
Recent Tariffs And Shipping Charges To The USA Have
Made This DIY Impractical Because Of The High Cost

Manufacturer P/N: SKHHBSA010
Mouser P/N: 688-SKHHBS (about $3 USD for a set of 18)
Operating Force: 2.6 Newton**
Operating Life: 200,000 cycles
Size: 9.5mm (H) x 6mm (W) x 6mm (D)
** Original MKS-50 factory tact switches had a 2.6 Newton Operating Force
(Roland P/N: 13159154 - ALPS P/N: SKHHBS)
This same switch is also used on the MKS-70 synth
The Operating Life for these switches is realistically, probably 10 years until stress and/or oxidation starts to set in and they become intermittent

Use a small sharp pair of diagonal flush wire cutters and cut all four leads off from the top side of the PCB. Take extra care not to wedge the wire cutters in‑between the base of the tact switch and the PCB when cutting the leads. This places excess force on the eyelet trace on the underside of the PCB causing possible damage. Use a solder sucker, a fine tipped soldering iron or a stainless steel hollow desoldering needle and remove the leftover pins from the PCB holes. Remove any excess solder remaining in the holes. The eyelet traces on the brittle 30‑year old PCB are very fragile. Take extra care not to lift them off the surface of the PCB while desoldering. Using too much heat or keeping the soldering iron too long in one spot usually leads to this type of problem. Also, use caution when removing and replacing the four black button assemblies on the Panel Board. The thin tabs are quite fragile and as you can imagine, replacement buttons are nearly impossible to find
As an extra measure of making sure the buttons provide good response, I also added an extremely small amount of very fine oil on the plastic areas on the side of the buttons where they rub together. It's important not to overdo the oil because it has no place to go as it's not absorbed and all surfaces are flat. Sewing machine oil is ideal. Don't use WD‑40 because it's too harsh and will remove the ink used to stencil the button text

MKS-50 Panel Board before and after the tact switches are removed
Note: I've include this image with D19 (MIDI MESSAGE LED) and CN2 highlighted for a reason. Be sure to inspect the solder connections on the backside of your Panel Board at these two locations. On my MKS‑50, there were two pins at D19 and CN2 which were never soldered onto the circuit board at the factory! This explains why my MIDI MESSAGE light never worked!!! I wonder how many units rolled off the Roland assembly line with this same problem?
A total of 34 tact switches are needed for the Alpha Juno‑1 and 35 are needed for the Alpha Juno‑2. However, there are two different types used on each synth. One type is used underneath the Membrane selections (BANK, NUMBER, PRESET, MEMORY, MIDI, MOD RATE, etc...) and another type is used underneath the Buttons on the left side of the case above the Bender Bar (DOWN, NORMAL, PORTAMENTO, and CHORD MEMORY). Do yourself a favor and buy a couple of spares of each because... shit happens
30 Of These Switches Are Needed for the Alpha Juno‑1, HS‑10 and SynthPlus 10 (BANK, NUMBER, PRESET, MEMORY, MIDI, MOD RATE, etc...)
31 Of These Switches Are Needed for the Alpha Juno‑2 (CARTRIDGE, BANK, NUMBER, PRESET, MEMORY, MIDI, MOD RATE, etc...)
Brand Name: ALPS
Manufacturer P/N: SKHCBHA010
Mouser P/N: 688-SKHCBHA010*
Operating Force: 2.6 Newton
Operating Life: 500,000 cycles
Size: 4.3mm (H) x 12mm (W) x 12mm (D)
(Original part numbers, now obsolete ‑ Roland: 13129704 / ALPS: SKHCAB131A**)
(This same factory installed tact switch was also used on the JX‑10)
* For unknown reasons, the ALPS price has recently tripled and discount quantities only start at 1,000 pieces!
As of , OMRON P/N: B3F-4005 is the best value


Alpha Juno-1 / Alpha Juno-2 Panel Board A and B
(Note: Panel Board B is for an Alpha Juno-1 - The CARTRIDGE tact switch is missing)
(Note: Panel Board B is for an Alpha Juno-1 - The CARTRIDGE tact switch is missing)
Alternate Tact Switches:
ALPS P/N: SKHCBFA010 (1.3 Newton)
OMRON P/N: B3F-4000 (1.3 Newton)
OMRON P/N: B3F-4005 (2.6 Newton)
4 Of These Switches Are Needed for the Alpha Juno‑1, Alpha Juno‑2, HS‑10 and SynthPlus 10 (DOWN, NORMAL, PORTAMENTO, and CHORD MEMORY)
Brand Name: ALPS
Manufacturer P/N: SKHHARA010
Mouser P/N: 688-SKHHAR
Operating Force: 2.6 Newton
Operating Life: 200,000 cycles
Size: 5mm (H) x 6mm (W) x 6mm (D)
(Original part numbers, now obsolete ‑ Roland: 13169633 / ALPS P/N: SKHHAD039A**)
(This same factory installed tact switch was also used on the D‑70, Juno‑106, S‑10, S‑50, S‑550, S‑750, and W‑30)

 Alpha Juno-1 / Alpha Juno-2 Volume Board
Alternates:
ALPS P/N: SKHHAMA010 (1.6 Newton)
OMRON P/N: B3W-1000S (1.6 Newton)
OMRON P/N: B3W-1002S (2.3 Newton)
HS‑80 / SynthPlus 80
A total of 32 tact switches are needed for the HS‑80 and SynthPlus 80 and these are all the same part number. Do yourself a favor and buy a couple of spares of each because... shit happens
Brand Name: ALPS
Manufacturer P/N: SKHHARA010
Mouser P/N: 688-SKHHAR
Operating Force: 2.6 Newton
Operating Life: 200,000 cycles
Size: 5mm (H) x 6mm (W) x 6mm (D)
(This same factory installed tact switch was also used on the D‑70, Juno‑106, S‑10, S‑50, S‑550, S‑750, and W‑30)
Alternates:
ALPS P/N: SKHHAMA010 (1.6 Newton)
OMRON P/N: B3W-1000S (1.6 Newton)
OMRON P/N: B3W-1002S (2.3 Newton)
The Operating Life for these switches is realistically 10 years until stress and/or oxidation starts to set in and they become intermittent
Use a small sharp pair of diagonal flush wire cutters and cut all four leads off from the top side of the PCB. Take extra care not to wedge the wire cutters in‑between the base of the tact switch and the PCB when cutting the leads. This places excess force on the eyelet trace on the underside of the PCB causing possible damage. Use a solder sucker, a fine tipped soldering iron or a stainless steel hollow desoldering needle and remove the leftover pins from the PCB holes. Remove any excess solder remaining in the holes. The eyelet traces on the brittle 30‑year old PCB are very fragile. Take extra care not to lift them off the surface of the PCB while desoldering. Using too much heat or keeping the soldering iron too long in one spot usually leads to this type of problem
** Original Alpha Juno‑1 and Alpha Juno‑2 factory installed tact switches had a 1.3 Newton Operating Force
HS‑10 / SynthPlus 10 / HS‑80 / SynthPlus 80
Even though most of the buttons on the front panel of the HS‑10 / SynthPlus 10 / HS‑80 / SynthPlus 80 are labeled the same as the Alpha Juno‑1 / Alpha Juno‑2, there is a big difference with the way they are pressed, i.e. Membrane Buttons (Juno‑1 / Juno‑2 / HS‑10 / SynthPlus 10) vs. Regular Buttons (HS‑80 / SynthPlus 80). All 32 buttons on the HS‑80 / SynthPlus 80 are the same part number
Tact Switch Reference Page For Other Roland Synths/Samplers

Aftertouch Ribbon Cable Damage Daughterboard PCB
(click for larger image)
(click for larger image)
Some owners have reported finding that a small 2‑conductor ribbon cable has popped out of it's connector. This small ribbon cable connects the Aftertouch circuit to a very tiny Daughterboard PCB and then runs to the Main Board. Some well traveled synths are susceptible to this ribbon cable popping out while on the road or being shipped somewhere. Also, previous owners and service techs have sometimes neglected to plug it back in. It's quite easy to overlook during keyboard reassembly. The Aftertouch circuit on a Roland U‑20 has an identical setup. Look here for an image of the ribbon cable and its connector. Another issue with this small connector is the solder connections have broken loose over time. Use a magnifying glass and check the bottom of the Daughterboard PCB for hairline solder cracks. There is also a small white 2‑pin JST connector which accepts a 2‑wire cable that runs to the Main Board. On my synth these wires are Red and Brown. Make sure this JST connector has not been removed by the previous owner or service tech. Another related problem if the thin ribbon cable is inserted and re‑inserted repeatedly, over time the thin layer of graphite on top will wear off
❖ Problem #2 - Aftertouch Tone Parameters Are Set To Zero
Some Tones by default have their Aftertouch set to ZERO so if you create a new Tone, these non-working settings will carry over to the new Tone. Press the PARAMETER SELECT button and check the settings for DCO AFTR, VCF AFTR, VCA AFTR and MIDI AFTR. For best results, I keep all of these set to 15 and MIDI AFTR set to ON
❖ Problem #3 - Aftertouch Strip Oxidation Buildup
Over time, oxidation will build up on the carbon contact strips and they need to be cleaned. The actual solution is a simple fix but it is a very, VERY time consuming process to gain access to the Aftertouch strip:
1) Disassemble the synth as shown in Steps 1 and 2 of the Battery Replacement Guide
Use extreme caution when removing the Keyboard Chassis so that the Main PCB is not damaged!
2) Remove all the springs on the keyboard. The springs for black keys and white keys are different so keep them separated
3) Remove the transparent plexi covers holding the keys in place
4) Remove all the keys and keep them in order. Maybe even write down the number sequence on the underside of each key
5) Remove the long felt strip to expose the carbon contact strips
6) Use a Q‑Tip and a 50/50 diluted mix of distilled water & 91% isopropyl alcohol to clean the carbon contact strips and the top cover
DO NOT overclean the carbon contact strips because you might rub off all of the carbon layer!
I will repeat this
 DO NOT overclean the carbon contact strips! One very light swipe should be plenty
7) Reassemble everything and remember to plug in the small 2-conductor ribbon cable back into the tiny Connector Board
Note: If the suggestions above don't work for you, there are some very good tips and tricks from Roland JX‑10 owners who have repaired the aftertouch on their keyboard using Zoflex and graphite powder. You may find some useful information at the Supersynthprojects.com website and also at the JX‑10 Aftertouch Page webpage since the same principles of restoring Aftertouch apply here

Bourns Rotary Encoder P/N: PEC11R-4015F-N0024 (24 PPR / 15mm Flatted Shaft / No Switch / No Detent / 2 Channels)
You will initially need to reference the supersynthprojects.com website then use this new image for the wire connections (click for larger image)
Update July 2019: One online visitor sent me an image of his encoder replacement which is much easier than my method shown in the PDF file below because there are no wires to cut. I opted to remove my encoder board because I wanted to resell the part on eBay

(click for larger image)
With a suggestion by Ray Bellis, I've designed a replacement encoder board which is "almost" a drop‑in solution. This new PCB uses the existing connector and wiring harness on the Alpha Juno. Simply solder the new $2 Bourns encoder and the old encoder wire harness onto this new PCB and pop it in place
Quick Tip: To remove the Alpha Dial easily, use two small screwdrivers or chopsticks and press through the two holes to pop the wheel out through the other side
I've set the price of this PCB with zero markup costs. The PCB ships anywhere in the USA for FREE. Shipping is also FREE outside of the USA but some countries may have customs and handling fees added onto the final price. My investment costs in producing this PCB is zero... only my design time. You can order the PCB from OSHPark at a minimal cost and the installation instructions are printed on the PCB. Because these PCB's are so tiny, OSHPark will only sell a minimum of three PCB's at a time. The price works out to about $1 per PCB. Still a bargain, especially if you own more than one Alpha Juno!

The other question is, "How hard it is to repair a defective encoder?" I've never opened up an Alpha‑Dial encoder myself, but here are some detailed images courtesy of Nikolaus Riehm at studiorepair.com. From the looks of it, if it's a minor problem like cleaning the contacts, the outer case can be opened up easily. However, I recommend getting the replacement encoder since the original is 30+ years old


(click images for larger versions)
Some More Cool And Very Detailed Alpha Juno Pics Are Here

Top: Alpha Juno-2 Bender Bar Wiring (click for larger image)
Bottom: Alpha Juno-1 PCB Connector (same as Alpha Juno-2)
Bottom: Alpha Juno-1 PCB Connector (same as Alpha Juno-2)
Jim Atwood In Japan
I have added the image on the right as a wiring reference after one online visitor reported that his Bender Bar was completely broken off as a result of shipping damages to his Alpha Juno‑2. All of the wires were snapped off from the precision potentiometer. Yeow!!! Even with a schematic, that's a tough one to solve without having another Alpha Juno‑2 nearby to reference


In short, you can save individual Tones to a Mac or PC in individual SysEx files using a generic SysEx program like Snoize or SendSX, load them back into the Alpha Juno‑1, Alpha Juno‑2, HS‑10 or HS‑80 and save them back to a different Tone location. However... the original Tone names are missing whenever you save it!!! Sheesh! In the Alpha Juno‑1 and Alpha Juno‑2 Owner's Manual in the MIDI Implementation Chart at the back of the book:
          Section 4 ‑ Recognized Exclusive Messages
          All Tone Parameters WITHOUT Tone Names
It's really screwy with Roland's design. I have no idea why they implemented it this way. Everything is sent to the synth and the Tone name even appears in the LCD window but it won't save the Tone name when pressing the WRITE button. It might be because the designers ran out of room on the EPROM chip. Dunno. Screwy. The way to do that, if needed, is below. This procedure might be useful for a one‑shot use of sending and saving Tone parameters but it's a giant waste of time to reorganize an entire bank of 64 Tones or Patches since you will need to change the Tone name for each one
- Press the MIDI button and set and set these parameters as shown
- MIDI LOCAL = ON
- MIDI EXCL = ON
- Set the MEMORY PROTECT switch on the back of the synth to the OFF position
- Ensure that both MIDI In and MIDI Out cables are connected
- Call up the Tone you want to save (i.e. Press the PRESET button then 8 [BANK] then 3 [NUMBER] on the synth to get T-83 TwiliteZne)
- Set the SysEx program on the computer to capture data from the synth. Ensure the capture buffer is empty
- If using Snoize, press "Record One"
- Press the [BANK] button of the Tone (i.e. press 8 [BANK]) and a stream of Tone data is sent to the SysEx program)
- NOTE: It is important to press only one button when sending Tone data from the synth. More than one button press will send too much SysEx data
- Save the SysEx file to your computer
- Press the MEMORY button then 1 [BANK] then 1 [NUMBER]
- Use your SysEx program to send the same SysEx file back to the synth
- You will notice the LCD now reads M‑11* TwiliteZne
- The asterisk indicates the current Tone data has changed
- Play a key and you will hear the TwiliteZne Tone at location M‑11
- All of the Tone data parameters were sent and also the Tone name. However, when you save the new Tone to Memory location 1 1, (i.e. Press and hold the MIDI button and press 1 [BANK] then 1 [NUMBER]), you will discover (unfortunately) the Tone name reverts back to whatever was originally stored at Memory location 1 1 but the parameter data has changed. When you save the new Tone to Memory location 1 1, it saves all of the new parameter data just fine but not the Tone Name! Very Weird, Indeed. You will need to edit the Tone name manually and re-save it to Memory location 1 1. A really screwy process. Thanks Roland!
For detailed info about how this SysEx file save/load process works, refer to the Release Notes of the Alpha Juno & HS APR Patch Reader Utility
MKS‑50 Only
MKS-50 MIDI implementation does transmit Tone names and Patch names but it does not automatically save anything. You will need to manually save the Patch and Tone data by pressing memory location numbers and the WRITE button for every Tone and every Patch
- Press the TUNE/MIDI button and set these parameters as shown
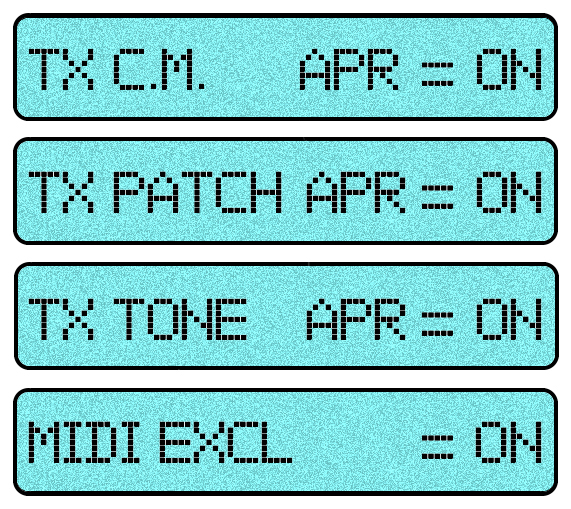
- TX C.M. APR= ON
- TX PATCH APR = ON
- TX TONE APR = ON
- MEM. PROTECT = OFF
- Ensure that both MIDI In and MIDI Out cables are connected
- Press the PATCH A←→B button
- Call up a Patch you want to save such as P‑A83 TwiliteZne
- i.e. Press 8 then 3 on the front panel to get P-A83 TwiliteZne
- Set the SysEx program on the computer to capture data from the synth. Ensure the capture buffer is empty
- If using Snoize, press "Record Many"
- Press the two numbers of the Patch you want to save (i.e. Press 8 then 3 on the synth to get P-A83 TwiliteZne) and data is sent to the SysEx program
- NOTE: It is important to press only two number buttons when sending Patch data from the MKS‑50
More than one button press will send too much SysEx data
- NOTE: It is important to press only two number buttons when sending Patch data from the MKS‑50
- Save the SysEx file to your computer and use the *.SYX extender
- To place the Patch you just saved (P‑A83 TwiliteZne) into a different location in the MKS‑50
- For example, to place it in location P-A12
- Send the *.SYX file from your SysEx program to the MKS-50
- You will notice the LCD shows T=a83*TwiliteZne (The asterisk indicates the Tone in the temporary area has been changed)
- Press WRITE - Screen says T-a83 -> a83 ok ?
- Press 1 then 2
- Press WRITE
- The LCD reads T:‑a12*TwiliteZne
- Press the PATCH A←→B button
- Press WRITE and the LCD shows P-A11 → A11 ok ?
- Press 1 then 2
- Press WRITE and the LCD shows P:A12*TwilightZne (The colon indicates the Patch in the temporary area has been changed)
- All of the Patch, Tone and User Definable Chord Data has now been saved to memory slot P-A12
For detailed info about how this SysEx file save/load process works, refer to the Release Notes of the MKS‑50 APR Patch Reader Utility
                             Keyboard      Keyboard     Keyboard    Keyboard Dynamics   Tape    M-64C   Built-In
                               Size       Aftertouch    Velocity      And Pressure      Save    Save    Speakers
                            -----------   ----------   ----------   -----------------   ----    -----   --------
            Alpha Juno-1      49 Keys     MIDI ONLY    MIDI ONLY       EV-5 & MIDI      YES      NO        NO
            SynthPlus 10      49 Keys     MIDI ONLY    MIDI ONLY       EV-5 & MIDI      YES      NO        NO
            Alpha Juno-2      61 Keys     YES & MIDI   YES & MIDI      YES & MIDI       NO       YES       NO
            SynthPlus 80      61 Keys     YES & MIDI   YES & MIDI      YES & MIDI       YES      NO        YES
            MKS-50          NO KEYBOARD   MIDI ONLY    MIDI ONLY       MIDI ONLY        YES      NO        NO

Another file floating around the Internet is direct from Roland and contains the factory presets for the MKS‑50. One would think that this will load into the other four synths but it will not. The filename is MKS50rig.MID and is in a MIDI sequencer file format, not SysEx. Roland chose the MIDI sequencer file format to distribute these datasets because they can fit the equivalent of five data files into one file. This file contains five datasets; Tone Group 'a', Tone Group 'b', Patch Group 'A', Patch Group 'B' and Chord Memory. When played using a sequencer, it loads these five datasets one after the other. In my opinion, this file is a big waste of time trying to troubleshoot connectivity problems. Just use *.SYX files, save yourself some time and be done with it. I chose not to make this file available for downloading on the TONES page
* The MKS‑50 stores all 128 Tones in RAM but also has an additional 64 Tones hard-coded onto ROM. These 64 Tones are not accessible during normal use but are designed to be copied from ROM IC7 to RAM IC8 during an Initialization Reset back to a default factory setting (when the [ 4 ] + [ 8 ] buttons are held down during a power‑up and the LCD display reads "FACTORY PRESET"). The 64 Tones stored on ROM IC7 are the same Tones in the *.SYX file called FACTORYA.SYX and are copied into Tone Group 'a'
 Battery Replacement Guide
 Key Replacement Guide
Jim Atwood provides some tips for keyboard problems including PCB repairs, dead key troubleshooting and cleaning key contacts:
Jim Atwood In Japan
Set the MEM PROTECT switch on the back of the synth to the OFF position
(These four synths can only store one Chord at a time in memory)
MKS‑50
Press the TUNE/MIDI button and set MEM. PROTECT= OFF
(The MKS-50 is great because you can store 16 different Chord Memories!)
CREATING AND PLAYING NEW CHORDS
For The Alpha Juno‑1 / Alpha Juno‑2 / HS‑10 / HS‑80
To create a new Chord, hold the CHORD Button and then press the WRITE Button
The red LED on the CHORD button will start blinking
The LCD will display "Write CHORD"
Play a chord on the keyboard
The red LED on the CHORD Button will turn off and the LCD will briefly display "Write Complete"
The new chord is now saved saved to memory
Press the CHORD Button and then play one key at a time to activate
For The MKS‑50
There's a lot going on. Way too many things to explain here
Refer to pages 39, 40 & 41 of the MKS‑50 Owner's Manual for detailed instructions

(click for larger image)
Two of the most popular online forums for getting a lot of synthesizer related questions answered is at gearsz.com and Facebook
http://gearsz.com
"Roland Alpha Juno" group on Facebook
1) The battery has died
Battery Replacement Guide
2) The battery was replaced and a RAM Initialization is needed
RAM Initialization Procedure
3) A Full System Initialization is needed
See Step #9 Of This Guide - 'Special Power-Up Sequence'
MKS-50
Press the [ TUNE/MIDI ] button
Press the [ PARAM ∇ ] button and the display will read MEM. PROTECT= OFF
Alpha Juno-1 / Alpha Juno-2 / SynthPlus 10 / SynthPlus 80
Locate the MEMORY PROTECT SWITCH on the back of the keyboard and change it to the OFF position
The *.SYX file you are trying to load is incompatible / corrupted
-or-
The DATA TRANSFER mode was not set correctly
MKS-50
When pressing the [ DATA TRANSFER ] button, there are five different settings to choose from to load data:
Bulk*Load [ T-a ] - Choose this to load Tones into Tone Bank a
Bulk*Load [ T-b ] - Choose this to load Tones into Tone Bank b
Bulk*Load [ P-A ] - Choose this to load Patch parameters into Patch Bank A
Bulk*Load [ P-B ] - Choose this to load Patch parameters into Patch Bank B
Bulk*Load [ CM ] - Choose this to load Chord Memory data
Notice the *Asterisk* !!!
If you choose a setting without the asterisk you won't be able to load or save any data on a computer or other external devices. The setting without an asterisk is only used if you have two MKS-50 modules and you want to transfer data from one to the other