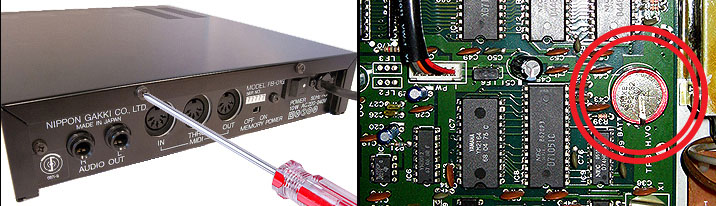

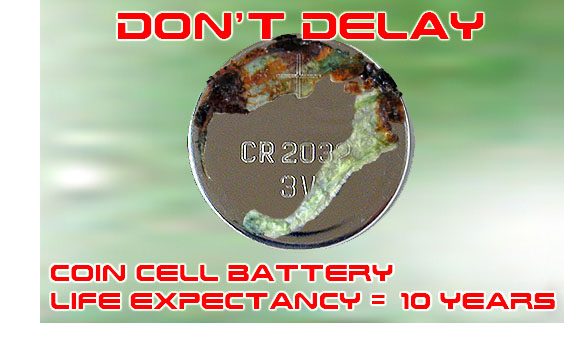
Well...... I finally replaced the internal lithium battery in my FB‑01. I've owned my FB‑01 for a looooong time and I've never had to replace the battery...... for 20+ years. I thought I would stay one step ahead of the game and replace the battery now before it leaks and causes any circuit board damage. I decided to install a battery holder at the same time so that future battery replacements will be easier. So...... the next replacement time will be when? The year 2042? I should mention that this is not a project for a novice. If you have little or no experience using a soldering iron, this is a really bad time to start learning. I recommend that you take your synthesizer to a Yamaha Authorized Service Center I recommend buying a name‑brand battery like Panasonic. Saving fifty cents to purchase an off‑brand is, in my opinion, a bad idea. This battery is going to last a very long time so get a quality one without the need to worry about a cheap‑o brand leaking and ruining your circuit board PARTS I buy all of my coin cell batteries from mouser.com The battery is a CR2032 Lithium Battery (Mouser P/N: 658-CR2032) The battery holder is a Through-Hole PCB Mount (Tayda SKU: A-869) PROCEDURE Before you start, make sure you have saved all of your patches and tones to an external device like your computer. * * * All of the internal patches and tones will be erased when the old battery is removed! * * * Make sure you are wearing eye protection, are properly grounded and working on a static-free workbench or table. * * * Please don't ignore the advice of eye protection, grounding and a static-free area * * * The chances of finding new circuit boards or a new eye...... slim to none ;) The replacement took me about 45 minutes from start to finish. I was taking extra time and being extremely careful to avoid any ESD nightmares (Refer to the images below) 1) Unplug the synthesizer! 2) Turn the module upside-down and remove (7) screws from the bottom and (6) screws from the sides and the back Do not remove the two screws which connect the transformer to the bottom case 3) Turn the module rightside-up and slide the top cover off (Do not unscrew the PCB from the metal bracket) 4) Unplug the three cable assemblies located at the front area and remove the faceplate cover 5) Carefully slide the PCB with the metal bracket out of the case 6) Once you locate the battery on the Main PCB, you will notice it is soldered into place. DO NOT UNSOLDER THE BATTERY. THERE IS ALWAYS AN EXPLOSION RISK! To remove the battery, use a small pair of wire cutters and carefully cut the battery leads from the circuit board and then discard the battery. 7) After cutting the battery leads off, unsolder the leads left behind and remove all excess solder from the holes on the circuit board. Ensure the holes are large enough for the new leads on the battery holder 8) Solder the new battery holder in place, insert a new CR2032 battery and re-assemble the case. You may need to extend one of the leads of the battery holder. A thick wire leg cut off from an LED works good by soldering it onto one of the leads of the battery holder to extend its reach 9) Because the battery was removed, you will need to use a "Special Power-Up Sequence" to initialize the FB‑01 back to the factory default settings Press and hold the [SYSTEM SETUP] + [INST SELECT] + [DATA ENTRY NO/‑1] buttons while turning on the power This button sequence sets the "Inititalize/Test Mode". The LCD display counts up to FFFF FFF FF then shows 
IMPORTANT A "Factory Fresh" setting will not be complete until you cycle the power again. The FB‑01 will remain in the "Inititalize/Test Mode" and the front buttons will not function normally until you cycle the power FB-01 Cover Removal (Bottom View)
Turn the module upside-down Remove (7) screws from the bottom, (4) from the sides and (2) from the back center area 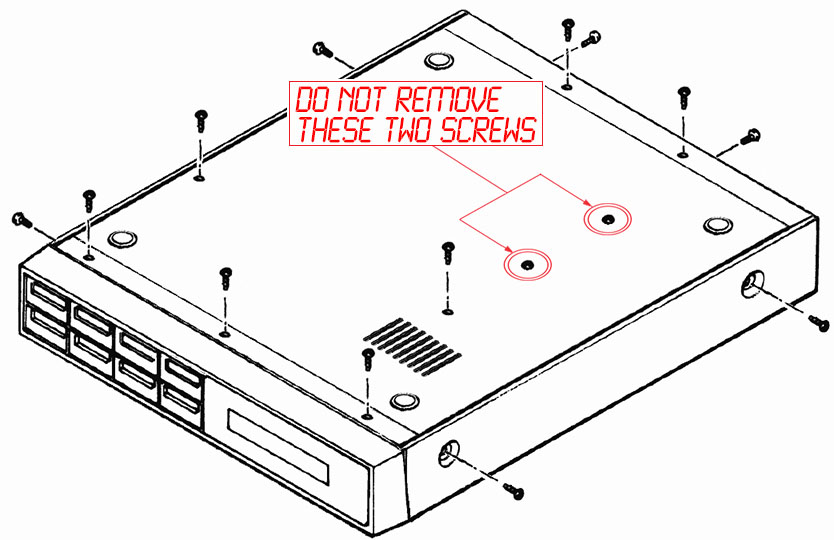
FB-01 Battery Location
Turn the module right-side up and slide the top cover off 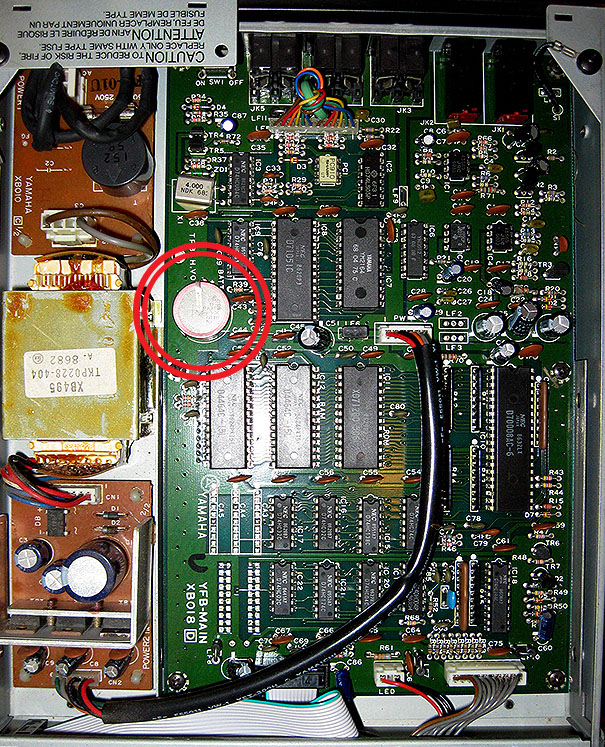
|
MISC. FYI - After removing the battery, performing the "Inititalize/Test Mode" and cycling power, ROM memory bank #3 containing 48 Voices (Tones) will be copied into RAM memory banks #1 and #2 making memory banks #1, #2 and #3 identical. ROM memory banks #3 through #7 contain a total of 240 preset Tones (48 Tones/Bank). RAM memory banks #1 and #2 contain 96 user programmable Tones. The FB‑01 is able to access 336 Tones from onboard memory, which is amazing for a synth module of that era. Most other synths of the same era are able to recall far less from their onboard memory... even when using an additional RAM cartridge
* Some unique exceptions to the second list are cartridges made by Frederic Vecoven and Symphony Series, Inc.
The absolute king of cartridges is the Vecoven O/S Upgrade and M-1024C which boosts the capacity of a Roland Super JX‑10 or MKS‑70 to a whopping 3136 Patches! No switches to flip either. Calling up Patches is made simple by pressing buttons on the front panel. The Symphony Model 128 (Yamaha) and Symphony Model 128/S64 (Roland) have two external DIP switches which allow the user to choose between four banks of cartridge data. This effectively boosts the capacity of the Yamaha DX7 to 160 Tones and the Roland Super JX‑10 or MKS‑70 to 320 Patches. More info about the Vecoven O/S Upgrade and Symphony Series, Inc. cartridges is here
| FACTORY STOCK SYNTHESIZER | MAX# OF ONBOARD PATCHES |
| Yamaha FB‑01 | 336 |
| Yamaha DX100 | 224 |
| Yamaha TX81Z | 160 |
| Roland Super JX‑10 / MKS‑70 | 128 |
| Roland MKS‑50 / Alpha Juno‑1 / Alpha Juno‑2 / HS‑10 / HS‑80 | 128 |
| Oberheim Matrix 6 | 100 |
| Kawai K3 | 50 |
| Korg EX-8000 | 64 |
| Ensoniq ESQ‑1 | 40 |
| Yamaha DX7 / Casio CZ-1000 | 32 |
| SYNTHESIZER (With O/S Upgrade and/or Optional Cartridge*) | MAX# OF ONBOARD PATCHES |
| Roland Super JX‑10/ MKS‑70 (w/Vecoven O/S + M-1024C) | 3136 |
| Alpha Juno‑2 (w/Symphony 128/S64) | 384 |
| Roland Super JX‑10/ MKS‑70 (w/Symphony 128/S64) | 320 |
| Yamaha FB‑01 | 336 |
| Yamaha DX100 | 224 |
| Yamaha TX81Z (no cartridge port) / Yamaha DX7 (w/Symphony 128) | 160 |
| Ensoniq ESQ‑1 (SQX‑20) | 120 |
| Oberheim Matrix 6 (no cartridge port) / Kawai K3 (w/RC‑2) | 100 |
| Casio CZ-1000 (w/RA‑3) | 48 |
* Some unique exceptions to the second list are cartridges made by Frederic Vecoven and Symphony Series, Inc.
The absolute king of cartridges is the Vecoven O/S Upgrade and M-1024C which boosts the capacity of a Roland Super JX‑10 or MKS‑70 to a whopping 3136 Patches! No switches to flip either. Calling up Patches is made simple by pressing buttons on the front panel. The Symphony Model 128 (Yamaha) and Symphony Model 128/S64 (Roland) have two external DIP switches which allow the user to choose between four banks of cartridge data. This effectively boosts the capacity of the Yamaha DX7 to 160 Tones and the Roland Super JX‑10 or MKS‑70 to 320 Patches. More info about the Vecoven O/S Upgrade and Symphony Series, Inc. cartridges is here
All images, text, JavaScript and HTML Code ©1995- by llamamusic.com